
Android Modbus TCP Server
Introduction
The Modbus Monitor Advanced app has many modes of operation known as Master Mode (Client) and Slave (Server) Mode. Technically this mode can be split into the new “Modbus Server Android App”, but it includes the same app for convenience and ease of use.
The Server mode of the app turns your Android device into the Modbus TCP Server or Sensor Server. Modus Monitor Advanced only supports Modbus TCP protocol when running in the server mode. Check out our Modbus Monitor XPF if you require more protocols in server mode). Any other protocol option selected in the Monitor Point is ignored other than Modbus TCP.

The main window shows all monitoring points that are available and the points list is shared during both Master and Slave operation (saving data entry steps).
Click the Server Icon to start and stop the Modbus TCP Server. The Server IP Address and Port are shown below the icon when the server starts successfully. The value next to the port in parentheses indicates the number of clients connected to the server.
Build a Modbus Map by adding a list of monitoring points in the main window. Each monitoring point added reflects the value in the memory and sent to the Modbus client when a value matching the address in the monitoring point is requested. Visit the Client page to learn more about how to add and manage monitoring points.
Sensor Server
The Server Mode can be switched to Sensor Server Mode simply by selecting the sensor in the Monitor Point Configuration. Data from built-in sensors (e.g., light, orientation, barometer) can be automatically added to a specified address that can be read by a remote client. The Sensor Server is discussed in depth on the Sensor Server Page. Instructions for adding a monitoring point can be found in the Modbus Monitor Advance’s main help.
Server Configuration
Configuration Server settings from Hamburger Menu | Settings | Sever
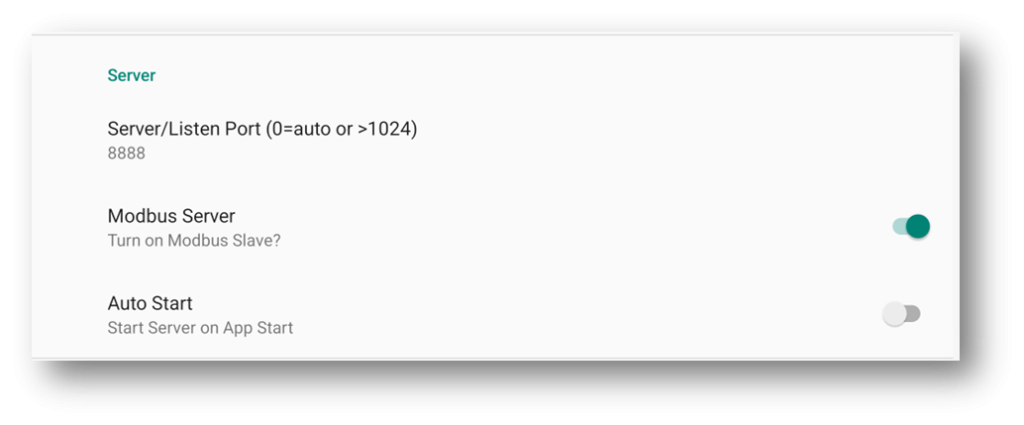
| Settings | Description |
| Server/Listen Port | Port to start the server on (8888 Default). >Set 0 to automatically find the next available port >Android blocks many ports so be sure to set a port greater than 1024 or check your device. |
| Modbus Server | Show or Hide the “Server” icon on the quick button Main Window. On by default. |
| Auto Start | Automatically starts server when app is started |
First, set up the Modbus TCP with the correct server port. This is done in the Preferences screen under the “Settings” menu. Typically, this will be set to port number 502. However, port 502 cannot be used for the server unless your Android device is rooted, as the Android operating system blocks many ports below 1024. Many users prefer not to root their devices, so the only option is to use port numbers allowed by your stock Android operating system. You can use any port above 1024, provided it is not occupied by another application or the operating system. During our internal testing, port number 8888 was found to work well on many phones.
The Modbus Monitor Advanced App allows the setting of “0” for the port. When the port is set to 0, the app asks the Android operating system to find the best available port for Modbus Monitor Advanced. While this may seem like a convenient way to get a port without hassle, it can lead to issues with other devices on your local network. It is better to manually assign a port that you know won’t conflict with existing ports used by other devices on your network (e.g., a VOIP box). Taking a little time to select the correct port for the server will save headaches in resolving port issues with other devices on-site. For example, when we chose port 5060, our VOIP service started having issues with ringing and audio. Therefore, it is important to research and select the correct port for the Modbus TCP Server and use “0” with caution.
The second setup step is to turn on the Server feature so it can be started. This can be done by checking the “Modbus Server?” option under the Preferences screen. Turning this feature on will place the familiar “server icon” on the icon bar. The Server Icon is the only way to turn the Server communication on.
If there are no monitoring points in your list, add at least one to get the server started. This can be done easily by clicking (+) and configuring it similarly to the Modbus Master type. Ignore the IP Address and Port settings in the Monitor configuration dialog; leave them as default. Only the IP Address and Port in the Server Settings are used as discussed earlier. The image below shows the setting to serve five (5) float values (5 floats * 2 words/float = 10 counts). The Protocol must be set to Modbus TCP. The Modbus register starts at address 0 with a function code of 3 (PLC Register 40001). If you need help translating the address, refer to the Address page.